
What you’ll need: Inkjet Printer, Iron on Transfer paper for white/light material, white/light shirt or clothing, bag…, scissors, iron, and a hard surface.
Step 1: Find an image that you want to use

Step 2: Mirror/flip the image.
Most iron on transfer papers for white/light material need the image
mirrored/flipped. There are a few ways to accomplish this: 1.
Use your print preview- When you go to print and select print preview
sometimes your print preview box will include a small box you can check
that says “print mirror image, or print reverse.” 2. In your printer settings under page layout you can select mirror. 3.
If you don’t see either of those you can open the image in Paint on a
PC. In the tool bar at the top of the screen you can click on the arrow
next to “rotate” and drop down the menu and click on “flip horizontal.”
On a Mac if you open the image in Preview you can go under edit and
mirror the image. 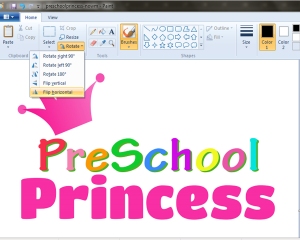

Step 3. Purchase Iron on Transfer paper for White/Light clothing.
I purchase mine at my local craft stores. Michaels, Joanns and Hobby
Lobby have great options and you can find coupons online. You might want
to pick up your shirt/fabric there as well. Some brands include:
Transfermations, Taylor and Jolee. Be sure the package says for
White/light clothing/material and not Dark/colored or Bright.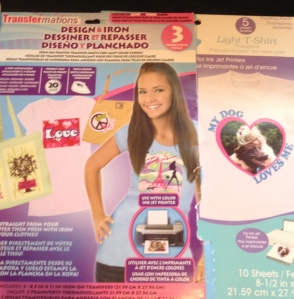
Step 4. Insert the paper into your printer. You need to use an INKJET
printer, you can not use a laser printer. The paper instructions will
tell you how to insert your paper so it will print correctly. Usually
there is a line down the middle of the paper on one side. You want to
print on the opposite side of the line. You can test which way your
printer handles the paper by putting a small x on a regular piece of
paper and printing a test image. Make note of how your paper is handled
so when the image prints it is on the correct side of the paper.
Step 5. Print your image.
Always use Print Preview when printing your image. The preview that is
shown of your image is how it will look once printed. Remember you want
the image to be mirrored/flipped. If the image is not fitting in the
print preview box correctly do not print. Use the scale or fit to page
option until you are happy with the image you see previewed. Then print.
Step 6. Cut out your image.
Iron transfer paper for white/light clothing/material is great to use
with images that contain a lot of text. Unlike other transfer papers you
do not need to cut out every letter. The background of the paper will
become clear once ironed on leaving only the image. However since the
background becomes clear it can have a bit of a shiny look so I
recommend cutting out your image as close as possible so any excess is
gone. On one side of your image leave a tiny bit of excess to allow you
to peel off the backing more easily once ironed on.

Step 7. Choose your shirt/material/item.
When using iron transfer paper for white/light clothing you need to use
a shirt or material that is either white or very very light. You can
not use dark fabrics. If you are unsure if the shirt is too dark do a
test on the inside of the shirt before ironing on your actual image.
Cotton works best. If you use a shirt with ribbing it can make the image
hard to stick. Tight clothing can cause the material to pull off of the
image once stretched.
Step 8. Set up your iron:
When ironing be sure that there is no water in the iron. You need to
use a hard surface like a piece of wood. Do not use an ironing board.
Heat the iron to medium/high and pre-iron your shirt/material.
 Step 9. Ironing on your image. Lay the image face down so the colored/printed side is laying flat on the shirt.
Now
you are ready to iron. Press down on the image and hold for approx 20
seconds. Then lift, move and press down again for 20 secs…. You do not
want to run the iron over the image like you would normally iron. Check
the edges of the image to be sure they are stuck on tight to the shirt.
Go over all areas at least once, maybe twice.
Step 10. Peeling off the backing from your image.
This is the trickiest part. Wait until the image has cooled at least 30
seconds. Start with the excess that I told you to leave in part 6. Use
your finger nail to separate the iron transfer stuck to the shirt from
the paper backing. You can slightly rip the paper backing to get the
peeling started. Peel off very slowly. If any of the image starts coming
up stop, lay the backing back down and iron over it again.


Step 11. You’re finished!! Now the image is on and ready to be shown off! You can find this image and the Kindergarten Princess image at https://www.etsy.com/listing/161126307/preschool-princess-printable-school-iron and https://www.etsy.com/listing/154683454/kindergarten-princess-printable-school?ref=shop_home_active

Find applique patterns at https://www.etsy.com/shop/AdornablePatterns
Plus you can choose the picture you like and use it on your shirt. I decided to try doing it myself and I am surprised how nice it turned out, so i wanted to share it with you.
ReplyDeletePlancha de transfer